
How TO SHELLAC MANICURE AT HOME
Want that shiny shellac manicure look at home? You can get it with just a few supplies that will last years. With a DIY shellac mani, you can save time by doing your nails on your schedule without the hassle of booking and driving to spa appointments. You can also save a boat load of money (I pay for an annual family cruise with the money I save from professional salon manicures for a year). Plus, the long-lasting coverage of shellac nail polish takes a lot of the hassle out of getting ready for the day.
I started doing my own at-home shellac manicure in 2013 and have enjoyed doing my nails while sipping wine and catching up on Netflix ever since. In fact, it’s a regular activity during for my Self Care Sundays Routine.
In this post you’ll learn the list of tools you need to get started with DIY shellac so your nails can look like mine in the @sipbitego Instagram vids and YouTube DIY tutorials.
At-home shellac on your own schedule
My hands have gained attention through my creative tutorials so I’m excited to teach you how to get the look, too. I love making tutorials for you, so you’re never obligated to click any affiliate links, like the ones in the links below. Thanks in advance if you do make a purchase, but you’re always welcome to just browse.
The 4 supplies You Need to shellac manicure yourself (at home)
- 70% Alcohol + cotton balls
- UV light + (optional) UV protecting gloves
- CND shellac base coat + top coat
- Colors to get started. Here’s my regular lineup of colors…
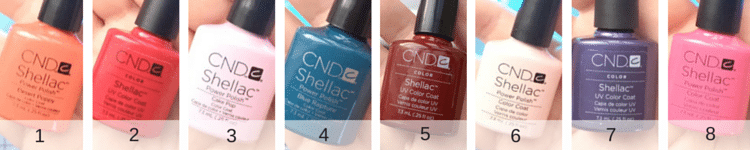 1 orange-red
2 red
3 white-wash (light purplish color)
4 blue
5 deep red
6 soft pink
7 purple
8 pink
Shellac manicure tips + FAQ
- 1 application lasts me around 2-3 weeks
- Within a handful of applications, the at home shellac kit can pay for itself
- CND shellac was a CLEAR winner after experiments with multiple long-lasting nail systems
- Start with a couple of your favorite colors + 1 top coat + 1 base coat
- Get ideas for choosing CND shellac nail colors
Get supplies to DIY your own shellac manicure
After you check out the list of shellac nail polish tools needed to do manicures at home, you’ll see why it was a no brainer for me to figure out the process + start painting my own shellac nails, whenever I want. Now the money I save on at home manicures goes towards a vacation splurge fund. (instead of weekly manicures). I hope you enjoy doing your own DIY shellac manicure at home, too. It’s as easy as it looks and makes life easier with less chipping.
Remember: chips are for potatoes.
SHELLAC MANICURE TIPS + FAQ
- 1 application lasts me around 2-3 weeks
- Within a handful of applications, the at home shellac kit can pay for itself
- CND shellac was a CLEAR winner after experiments with multiple long-lasting nail systems
- Start with a couple of your favorite colors + 1 top coat + 1 base coat
- Get helpful ideas for choosing CND shellac nail colors
Keri says
I’ve never tried this before. I generally don’t do my nails because they don’t last without chipping but I may have to try this now.
krystle cook says
My toes though are looking pretty sad right now with no polish. I need to fix that but it’s winter LOL.
Beth says
I don’t paint my finger nails at home. I could make the time though.
michelle_ says
Love the colors, my nails right now are natural though!
Cathi says
I need to get brave and do my own manicure. I usually take my daughter for a mani/pedi date but we would have just as much fun doing it ourselves together.
Pam says
This is such a great tip! It would make for a fun girls night in!
HilLesha says
Those are beautiful colors! I’ll have to try this brand sometime.
Ellen says
This is a great idea. I love gel nails. They stay on much longer than a regular mani. To save money, I usually just get a gel mani and a regular pedi. I like the experience of going to a nail salon.